
ZIP System Vs. Tyvek HomeWrap Pros And Cons
 By: Jeff Hoch – Forensic Architect and Field Consultant
On March 23, 2015, Jorge Ibacache and Patrick McPherson, two Quality Built Technical Services employees, wrote an article on the Zip Wall system entitled Just Zip It?. At the time, the ZIP System® was a relatively new product. Our two authors therefore focused their publication on the pros and cons of the system as they observed it. Over the course of the year, Quality Built has recognized a definite rise in builders adopting the ZIP System for their air and weather barrier installations. This rise seems to be linked directly to the claims that the ZIP System manufacturer, Huber Engineered Woods, LLC, is making regarding the speedy installation and extended warranty associated with the product. Many of our clients have asked us questions about the ZIP System and how it compares to its main competitor – the Tyvek® HomeWrap® system. In order to provide an un-biased detailed evaluation, we have analyzed the in-house data we have collected from our clients, as well as performed research through other credible sources to outline the pros and cons of both products.
Both the ZIP System and Tyvek HomeWrap system claim to be superior to one another. However, each system is different in nature. We will discuss these differences as we explain the pros and cons of each. One major thing that both of these systems have in common, are that they are both part of the building envelope and therefore have the potential to pose significant risk of water intrusion and damage if not properly installed and integrated.
ZIP System – Description
ZIP System is manufactured by Huber Engineered Woods, LLC. The ZIP System includes two main components; the Zip System® sheathing panels and the Zip System® tape. The panels are made up of OSB wood structural sheathing with an exterior facer of medium density phenolic-impregnated polymer-modified material. This facer qualifies as a Grade-D 60 minute WRB. The seam sealing tape is a polyolefin sheet with an acrylic adhesive backing that makes the tape self-adhesive. Huber describes the tape as being pressure-sensitive.
Tyvek HomeWrap – Description
Tyvek HomeWrap is manufactured by E.I. DuPont De Nemours & Company, Inc. (DuPont™) DuPont Building Inovations. Tyvek HomeWrap is made up of olefin sheets that are manufactured from high-density polyethylene fibers. These sheets are non-woven and non-perforated and are manufactured by the material being flash spun-bonded using heat and pressure to create sheets of various sizes. The product is equivalent to a Grade-D 60 minute WRB.
Pros Of The ZIP System
a. Quick Instillation
As the Zip System panels have the WRB applied to the panels at the factory, there is a time saving in the installation – assuming the design calls for fully sheathed exterior walls and has no complicated elevation elements. This system becomes less time advantageous when the design includes complicated elevation elements that will require cutting panels of the sheathing to fit while maintaining the required 1/8 inch gap. The installation actually could be more time consuming and costly if the structural design does not call for fully sheathed exterior walls. Note that the sheathing must also be installed on all gable ends, etc. for a complete application – a task that would be accomplished more quickly and easily with a house wrap.
b. Not As Susceptible to Wind Damage While Waiting for Cladding
As the Zip System panels have the WRB applied to the panels at the factory, there is a time saving in the installation – assuming the design calls for fully sheathed exterior walls and has no complicated elevation elements. This system becomes less time advantageous when the design includes complicated elevation elements that will require cutting panels of the sheathing to fit while maintaining the required 1/8 inch gap. The installation actually could be more time consuming and costly if the structural design does not call for fully sheathed exterior walls. Note that the sheathing must also be installed on all gable ends, etc. for a complete application – a task that would be accomplished more quickly and easily with a house wrap.
c. Thirty Year Warranty
ZIP System offers a 30 year warranty, which is three times longer than the 10 year warranty offered by Tyvek®. However, there are a number of terms that purchasers should be made aware of, which we will discuss later in the cons section below.
Pros Of Tyvek HomeWrap
a. Can be Applied Over Open Studs
Since Tyvek HomeWrap is a sheet good, similar to traditional building papers, it can be installed over open stud framing as well as over sheathing. In some parts of the country it is standard to sheath the entire exterior. However, in many areas, that is not standard practice and Tyvek’s installation method may save material cost in those areas.
b. Seams are Lapped, Not Butted
Tyvek is a sheet good that comes on rolls and installs similar to traditional 60 minute building paper, which overlaps at the seams. While taping can be an issue (as we will discuss below in the cons section of installation), it does have an overlap to help protect the structure from water intrusion.
c. Window Heads and Other Similar Conditions are Lapped in a Weatherboard Manner
This was not the case when the product was newly on the market, at which time the instructions and details called for the Tyvek to wrap into the window opening and then the window was installed and taped on all sides to seal it. Several years ago Tyvek revised their installation instructions and details to provide a weather board lap at window heads and similar conditions.
Cons Of The ZIP System
a. Sheathing Panels are Butted and Taped Creating a Reverse Lap
The sheathing boards are butted together with a 1/8 inch gap between panels. This joint is then covered with the seam tape. This can create a path for water entry into the structure through wrinkles or improperly applied tape. The tape is required to be applied to clean, dry surfaces that are free of dirt, dust and frost. Contact of the adhesive surface of the tape with any foreign matter that may affect the bond must also be avoided. Both the air temperature, as well as the temperature of the sheathing must be at or above 20°F at the time of tape installation. Per the ICC ESR report, wrinkles in the tape are permissible “unless they create a leak path.” Unfortunately, we have seen the tape installed improperly on many occasions in the field. Improper installations have involved wrinkles allowing room for water leakage, as well as inadequate bonding due to the surface being dusty, wet or frosty. All of these issues will void the warranty.
b. All Penetrations Create a Reverse Lap
The method for treating any penetration including windows is to flash them with the ZIP System tape. This installation method results in a reverse lap at the head of penetrating items as indicated in the details provided in the ICC ESR report and on the Huber web site. These reverse laps are subject to the same issues discussed in the item above.
c. Fasteners Can be Over-Driven, Damaging the Membrane
Huber indicates that over-driven fasteners pose no problem other than possible structural loads for the panel. However, DuPont proved that water intrusion can occur at over-driven fasteners by performing water tests on this particular circumstance.
d. The Entire Structure Must Be Sheathed
Because the WRB is applied to the sheathing at the factory and is not available in sheet format like HomeWrap, the product cannot be installed over open stud framing like the sheet goods are capable of. Installation over open studs will require the installation of the sheathing with all required fasteners and seam sealing. This may increase cost for the material and install, which would contradict the time saving advantage that there claims to be.
e. Framing Hardware is Not Behind the Weather Resistive Barrier (WRB)
Since the ZIP System panels are already manufactured with the WRB attached, the framing hardware, such as straps, will occasionally be installed over the WRB. As water or moisture can accumulate and run down the WRB, the hardware is essentially exposed and the engineers and framers should pay special attention when selecting framing hardware and fasteners. These structural components will corrode at a higher rate than when installed behind the weather resistive barrier.
f. Warranty is Non-Transferable
Note that the ZIP System warranty is not transferable, and is only for the original home owner, builder, or commercial property owner. Warranty conditions and exclusions mean very difficult to get coverage.
g. No Warranty Available for Some Condominium Projects
Based on the language in the warranty indicating the types of products each applies to, many condominium projects may not be covered by a warranty at all. Any building where the units do not meet the single-family detached, duplex, or townhouse descriptions in the code, and that are not maintained in the possession of the original commercial owner will have no warranty coverage available.
h. Need Galvanized Seismic Straps and Fasteners
The warranty may be voided if it can be shown that the structure does not conform in any way to all applicable building codes and industry standards. Also, the warranty excludes conditions related to or caused by damage to the deterioration of the exterior wall or roof. A defense attorney for Huber could argue that this means damage caused to or by the ZIP System voids the warranty.
Cons Of Tyvek HomeWrap
a. Can Be Damaged by Wind
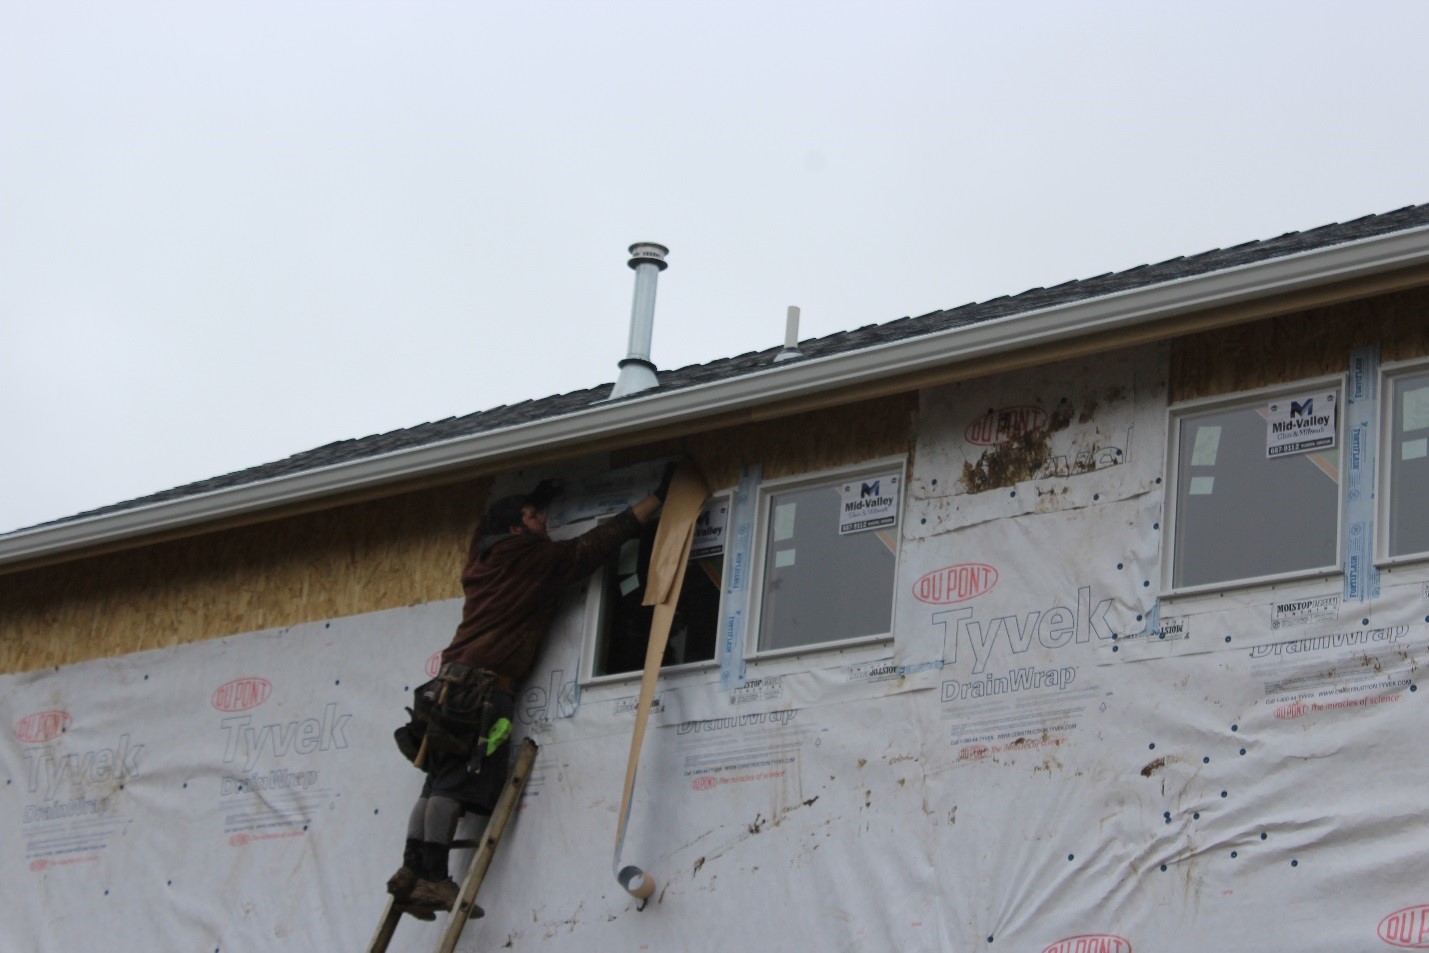
As the exterior cladding and thus the final fasteners and securement of the Tyvek HomeWrap may not be installed for several weeks after the HomeWrap, the HomeWrap is potentially subject to damage from high winds during this time. We have noted that the areas of the country where the risk of wind damage is the greatest are the same regions where the HomeWrap is being left exposed for longer durations with only the temporary fasteners installed to secure it in place. Additionally, a rep for the manufacturer in one of these areas is encouraging installers to use as few fasteners as they can so as to reduce the number of penetrations of the HomeWrap. While this makes sense from a water intrusion risk reduction stand point, the potential damage when the HomeWrap is blown off of the structure exposing the structure to potentially larger volumes of water is much greater. Additionally, as work progresses on the interior of the structure after the HomeWrap is installed and prior to the cladding being installed, the potential for other building products to be damaged increases.
b. Is a Second Step Beyond Sheathing
For areas of the structure that will receive sheathing on the exterior walls, the installation of HomeWrap is a second step that must occur after the sheathing is installed and in some cases inspected by the local jurisdiction for compliance with the braced wall plans and schedules.
c. When Used as an Air Barrier, May Also Have a Reverse Lap
The ZIP System is not the only system to incorporate a reverse lap. Many house wraps that will function as both a weather resistive barrier as well as an air barrier, incorporate a reverse lap. This occurs when the horizontal seams are taped to seal them to reduce the air leakage. See our tech alert on seam seal tapes for more information on this issue. One important distinction between the ZIP System and Tyvek, is that Tyvek HomeWrap is required to have six inches of overlap of the upper layer over the lower in a weather board fashion. While this does not prevent water that gets past a bad tape joint from getting into the structure, it does reduce the level of risk associated.
Conclusion
We would recommend that you consult with building envelope experts as well as your insurance provider and have the warranties reviewed by a lawyer before deciding on which products to install – especially for high risk items like the WRB. Once you have decided on the product, we would recommend retaining an independent third party for Quality Assurance services to look at your plans and processes including; installation and testing, as well as documentation and correction of anomalies. You should also have a third party firm perform Forensic Quality Control testing to verify that the installation is providing the intended results. We have seen certified products which appeared to be properly installed, fail quality control tests. It is one thing for a product to pass laboratory testing and an entirely different thing to have it pass in the field when installed under field conditions. For more on this, see our tech alert on Forensic Testing.
Reference Links
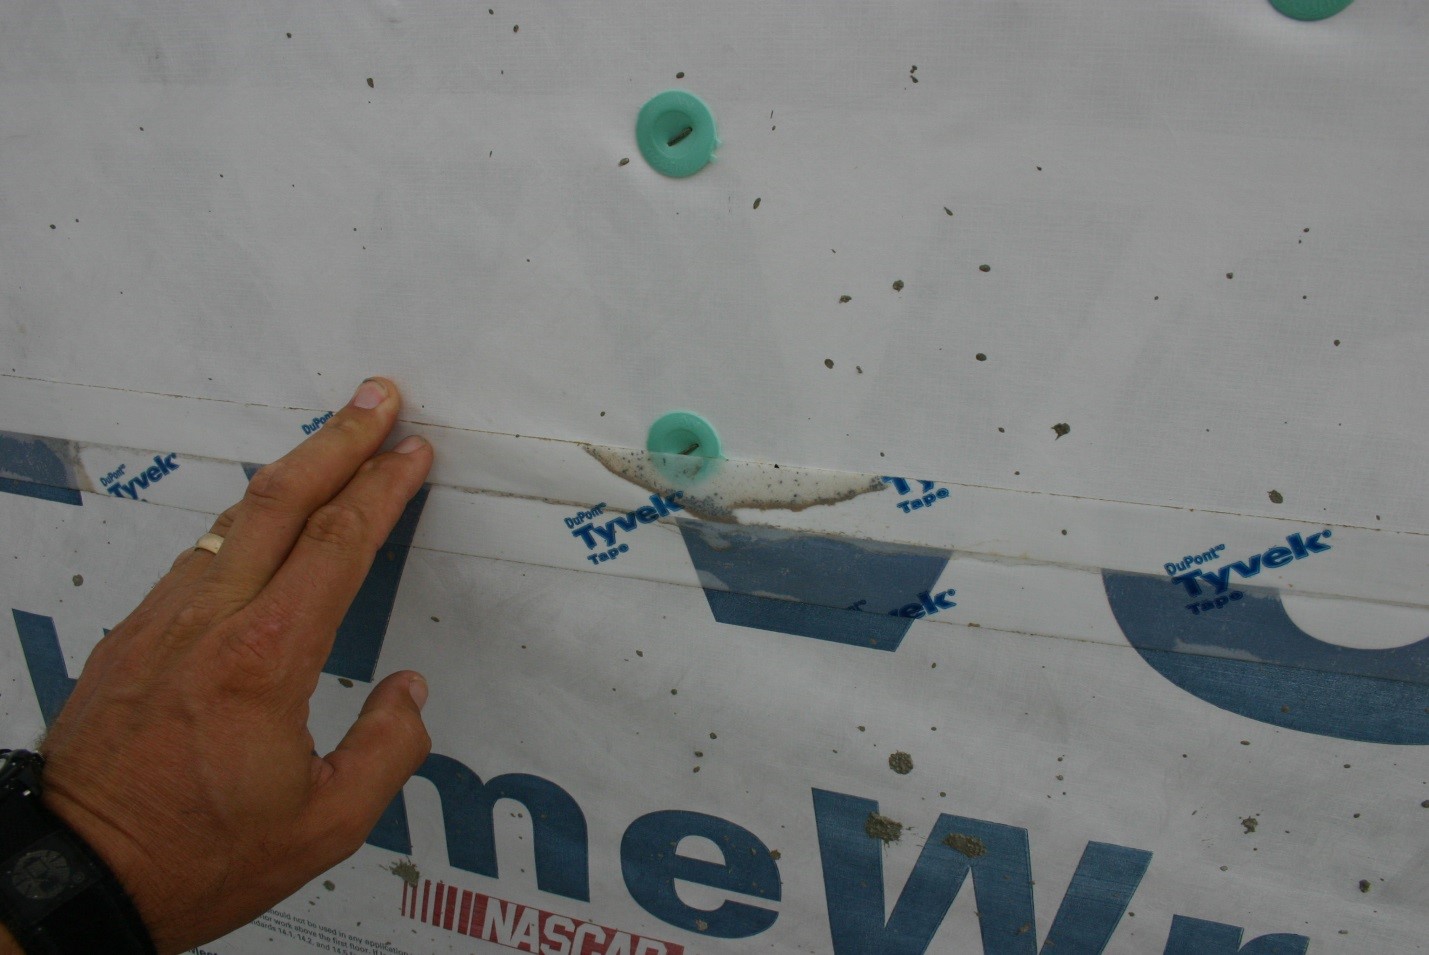
Debris provides evidence of water migration behind seam seal tape. Note that the debris has spread horizontally along the seam:
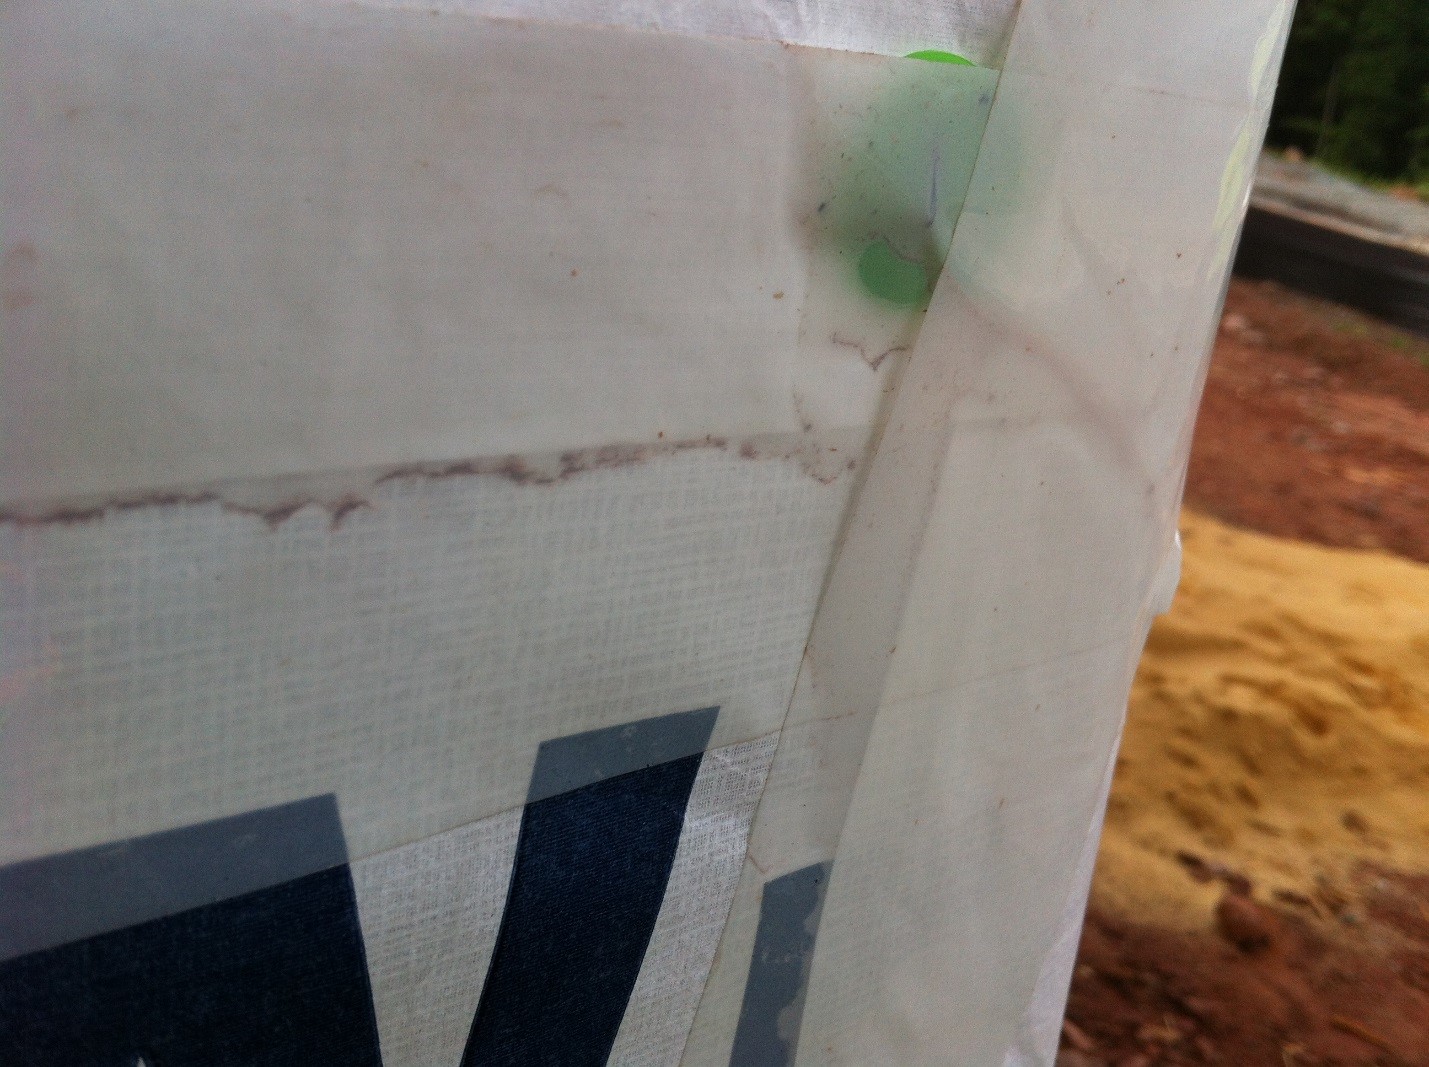
Here the debris extends past a vertical seam, which can easily result in water intrusion:
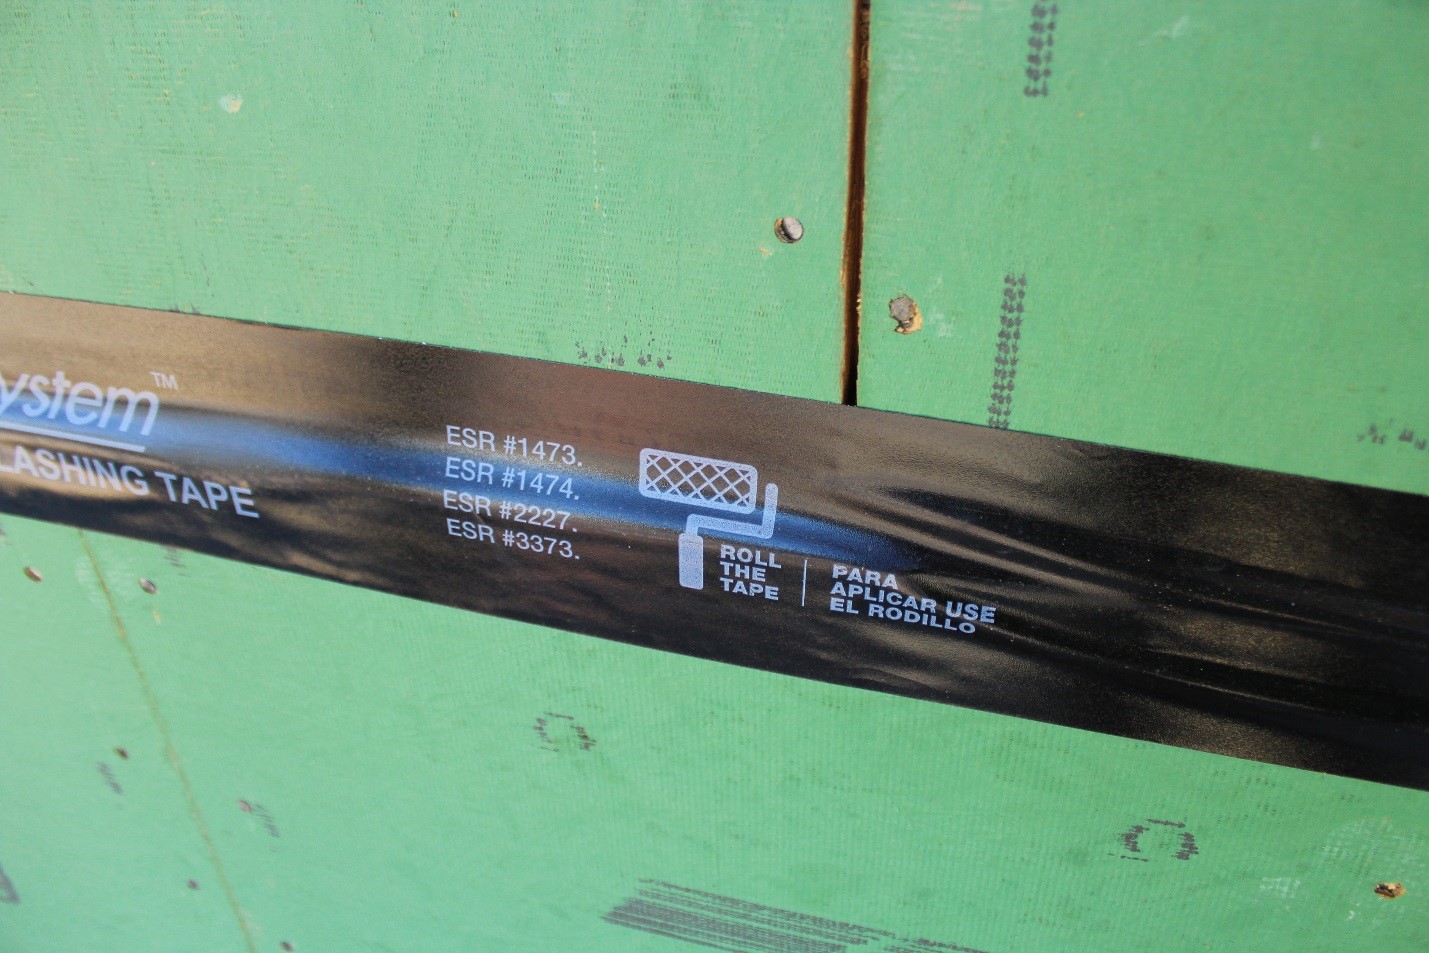
ZIP System flashing tape with graphic indicating the requirement to roll the tape:
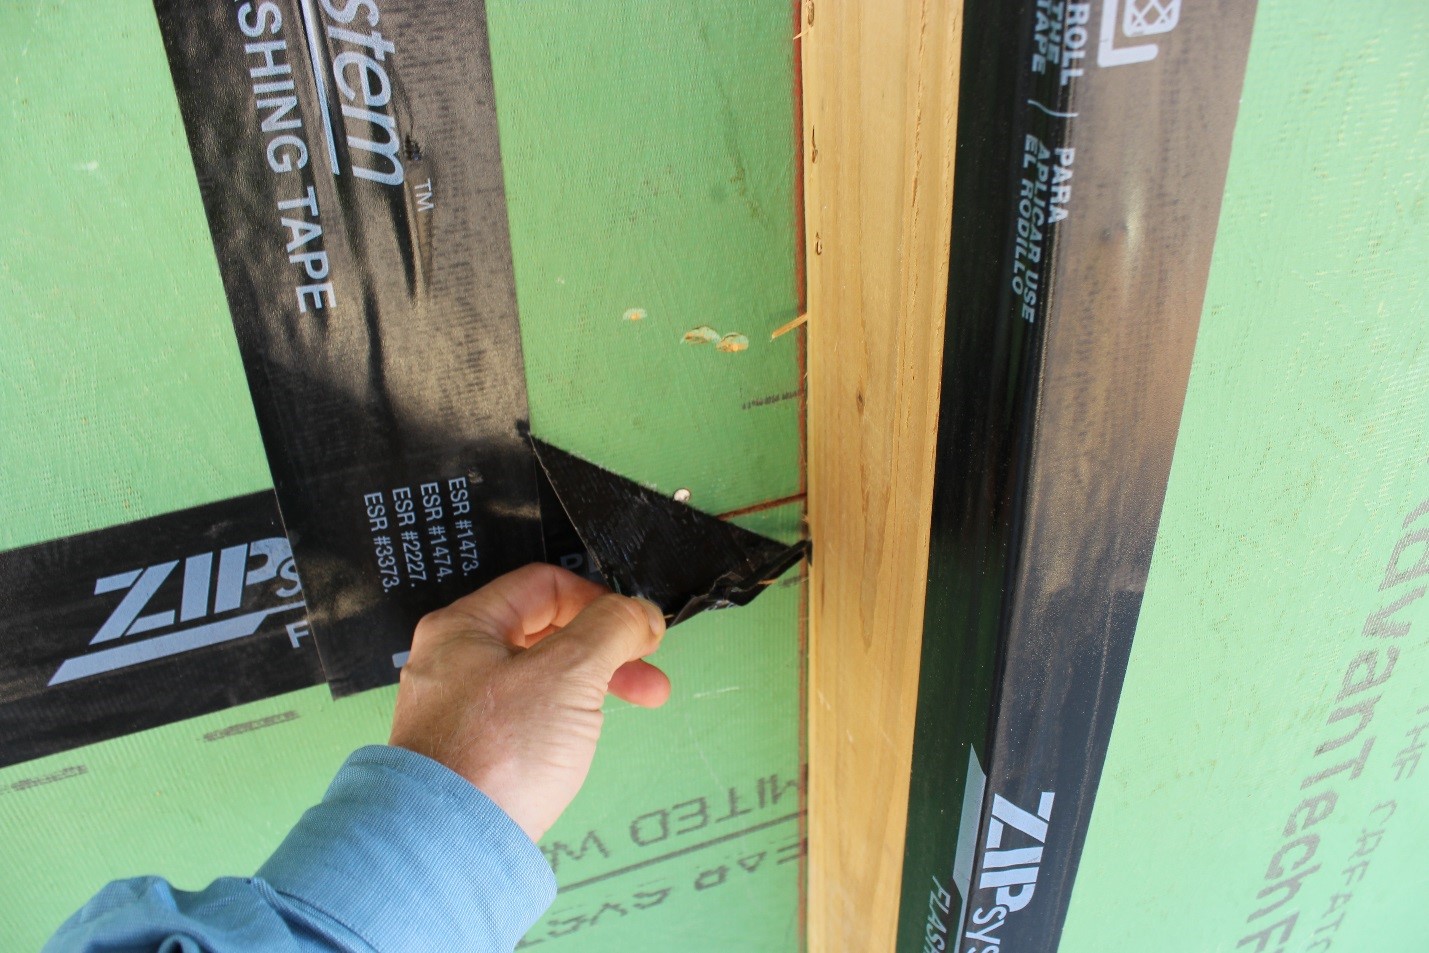
ZIP System tape was not adhered near the end of a seam at an inside corner:
Deck to wall flashing installed over the ZIP System panels creating a reverse lap:

Typical of construction in a wet climate, the house wrap has mud and other debris on it. Similar conditions can be found with sheathing products. For wither product, this mud and debris must be cleaned off for the tape to bond to the WRB. It is not uncommon to find the tape not properly bonded because the surface is contaminated at the time the tape is being applied:
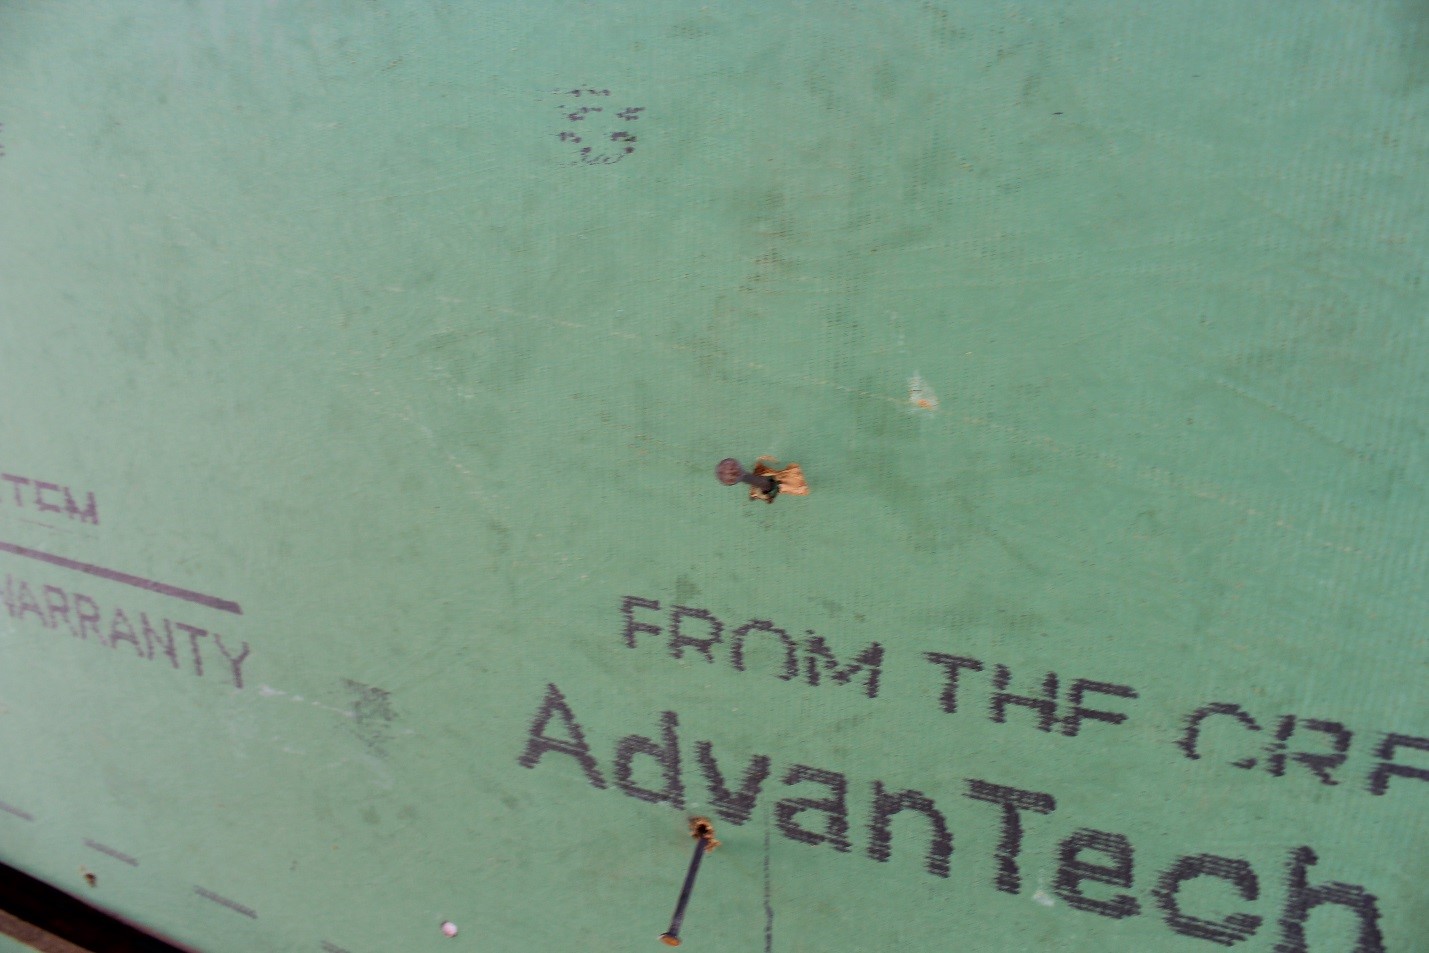
Shiners backed out which leave holes in the ZIP System panel that will need to be sealed:
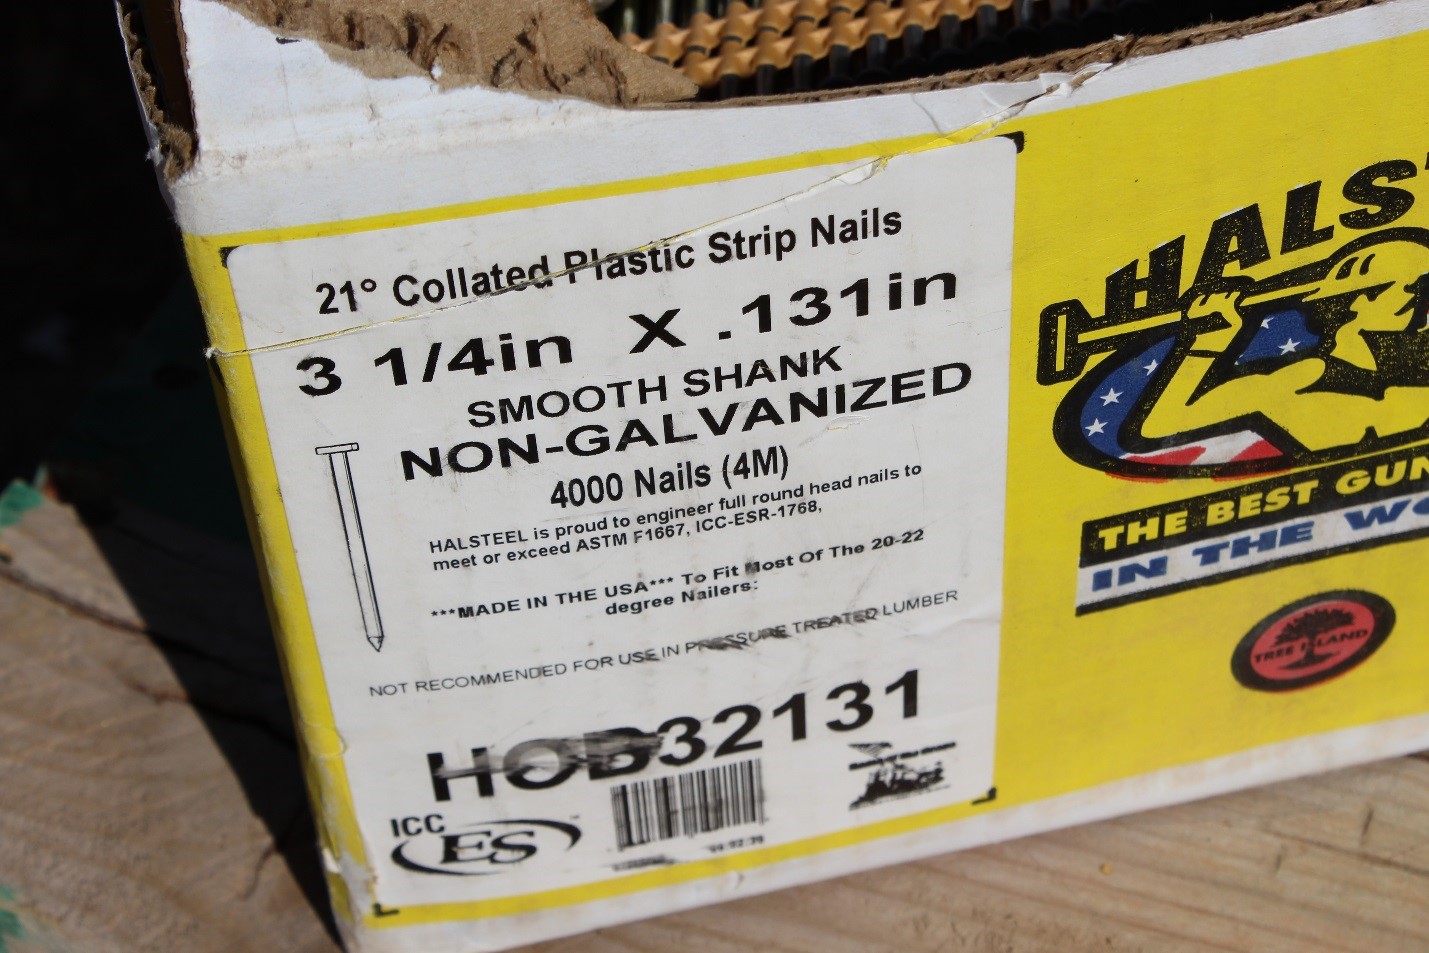
Nails being used to attach the ZIP System panels were typical framing nails and are non-galvanized despite the fact that the heads will be exposed to moisture as they are not covered by the WRB but are holding the WRB in place:
 ABOUT THE AUTHORS

Jeff Hoch is a licensed architect and has been involved in the construction industry for over 27 years. He has a passion for safety and strives to educate the industry about building best practices and risk mitigation techniques. Jeff is constantly taking part in educational seminars and is extremely knowledgeable when it comes to building code requirements. Jeff performs inspections all across the nation and specializes in forensic inspections, AAMA/ASTM water testing, technical peer plan reviews, quality assurance, and much more. He also is extremely experienced with design standards, local ordinances, forensic building failure analysis, and construction defects.
Below is a great maintenance checklist sent over to us from the folks at Dynasty Partners Custom Homes and Development. The full article can be seen at their site here.
Home Maintenance Checklist:
Prevention of possible problems and repairs is the best option in every case. Caring for your home and property can help save you a lot of time and money in the long run. Even though some projects may seem like quite an investment, resolving small problems now and cleaning every part of your home thoroughly can help you to catch small issues before they become big ones! To save you the struggle of making your own home care checklist, we’ve prepared one for you. If you already have a list, compare ours with yours and see if you missed anything.
General Indoor Maintenance
□ Control and clean areas where you keep trash daily.
□ Paint your house as needed. Keep track of which areas were painted recently and which areas are in need of a fresh coat of paint.
□ Inspect and test fire alarms, smoke detectors, fire extinguishers, and any other fire safety equipment that you possess approximately every 6 months. An easy way to remind yourself is to change the batteries every time you change your clocks (if you have daylight savings)
□ Deep clean your house seasonally or four times a year
□ Service your air conditioning system in the Spring before turning it on. Yes, it will cost some money, but it’s better to service it than find out that something is broken later!
□ Check locks on all windows and doors and ensure their functionality.
□ Examine wood trim around windows and doors to ensure that there is no wood rot or other issues bi-annually.
□ Resolve insect issues immediately if you suspect an issue or see wood rot or debris near floors, walls, or your ceiling.
□ Examine HVAC filters every 30 days or more frequently if you or your family members have allergies.
□ Clean your dryer vent once a year.
□ Inspect your washing machine and its hoses approximately four times a year. Change your machine’s hose if it is leaking.
□ Clean ceiling fans before seasonal use and once or twice during the months you are not using it. Remove dust. Check all parts for functionality and safety.
□ Inspect all plumbing throughout the house for issues and clean aerators on faucets.
□ Check caulking and grout throughout the house.
□ Winterize your house by covering windows, checking for cracks and holes where cold air can enter and resolve any issues quickly.
□ Control issues with electricity. Confirm that your outlets are within electrical regulations.
□ Do not connect too many devices to the same power strip or chain power and extension cords together to prevent sparks and electrical fires.
□ Make sure to not overload the circuits.
□ Remove any frayed wires from home and replace them.
□ Keep any household items at least 6 inches away from radiators or space heaters.
□ Maintain and care for a forced-air heating system (if you have one) which includes replacing filters monthly or as directed by the user’s manual.
□ Inspect your thermostat once to twice a year. Clean the heat sensor and check to see if it is functioning correctly and accurately.
□ Examine all vents in each room with the changing of each season to be confident that they are clear of dust, dirt, and other objects.
General Outdoor/Seasonal Maintenance
□ Check and clean your gutters as well as downspouts. Be certain that they are not loose or leaky.
□ Utilize compacted soil in low-lying areas that can be at risk for flooding.
□ Maintain and trim trees and shrubbery, which is usually done in the Spring and or Fall.
□ Remove any dead or unsightly plants, trees, bushes, or flowers from your property.
□ Care for sick trees immediately; do not let them get worse.
□ Make sure your trees are not tangled with electric lines. If you cannot safely remove tree branches that interfere with any wires, hire a professional to do it for you.
□ Examine your sidewalk, driveway, and other areas with concrete. Check for cracks and seal them with concrete crack filler or silicone caulk. Reseal your driveway as needed.
□ Inspect the exterior of your house and look for any cracks, holes, or general wear and tear of the exterior of your home. Examine siding, clean, and repair if needed.
□ Check caulking around windows and doors
□ Check paint on the exterior for peeling and loose caulking
□ Clean window wells seasonally.
□ Look at your screens for your windows and doors in the Spring and the Fall. Check for issues and repair or replace.
□ Monitor and clean exhaust vents on the exterior of your home.
□ Cover exposed pipes (indoors/outdoors) with insulation to keep your house the right temperature and prevent pipes from bursting.
□ Clean outdoor grill after each use, at the end of the summer, and before the next summer. Put away securely during winter and cover. Ensure that gas tank is properly closed if gas is used.
□ Maintain your patio, balcony, or deck. Check for insect nests, loose boards, and general wear and tear.
□ Carefully store firewood at least 2-3 feet from your house and 1-2 feet above the ground. Move the firewood seasonally and check the wood for bugs. Keep your wood covered if possible.
□ Inspect outdoor faucets for leaking or for freeze damage. If the water runs slowly or not at all you may have issues with leaking or frozen pipes. Turn outdoor faucets on and run them during the year if they are not used regularly. Turn off valves to outdoor faucets during the winter.
□ Test all garage-door functions including the reverse feature as needed.
□ Check and clean outdoor yard equipment such as your lawnmower and power trimmer before use.
□ In the winter months, check for icicles and ice dams. Ice may look pretty but it costs a lot if it damages your home!
□ Check heating system before winter.
□ Control needed winter equipment such as shovels and snow blower before the start of winter.
Kitchen
□ Control and check your kitchen garbage disposal/incinerator if you have one. Ensure that it is not clogged anywhere, and clean with hot water and baking soda or vinegar ice cubes.
□ Check for insects along the floor, windows, doors, and any areas that can allow insects to enter. Be certain your kitchen is properly maintained and cleaned weekly.
□ Clean hood range filters and grease filters at least twice a year.
□ Inspect the fire extinguisher to ensure that it is charged completely. Replace if needed or out of date.
□ Clean refrigerator coils, behind your refrigerator, and under your refrigerator. Fun Fact: Did you know that vacuuming your refrigerator coils can save you up to 15% on your electricity usage?
□ Check traps for clogs.
□ Exercise your shutoffs once a year so they don’t get calcified
Bathroom
□ Check caulking around your bathtub, shower, and sinks, and fix any areas that need re-caulking regularly.
□ Remove and clean showerheads.
□ Remove, check, and drain stoppers. Remove hair and other debris in drains.
□ Examine the rubber seal on your bathtub and fix or change if there appears to be damage.
□ Clean and check the toilet regularly for leaks.
Other Areas of Your Home/Basement
□ Clean both your basement and garage bi-annually (or more often), remove dirt, check for cracks, and inspect any areas that can invite unwanted insects or water into your home.
□ Check your hot water heater regularly and the pressure relief valve. Remove sediment from your water heater as needed. Put a water heater blanket over your water heater.
□ Check your water softener approximately every 4 months and add salt as needed.
□ Inspect your roof and shingles for damage, holes, loose parts, or buckling at least once a year!
□ Examine the exterior and interior of your chimney and clean if you have one (as needed). You may consider hiring a certified chimney sweep.
□ Look at your attic’s insulation and decide if it is sufficient. Are there holes or is the insulation thin? Add more to save money on your winter heating bill.
□ Control racks, shelves, and knobs for tightness and security throughout the house and in the closet. Avoid placing too much weight on shelves in the closet.
□ If you have a sump pump, clean the pit once a year
□ Have your septic pump monitored annually.
If you’re feeling overwhelmed by the checklist, take a deep breath!
Many of the things on the list you are probably already doing out of habit. You may have seen your parents or family members do some chores on this list too if you haven’t done them yourself yet. You’ll be surprised how much you can do on your own or with a helping hand!
How to Be a Homeowner 101: Planning Ahead and Budgeting!
If you are a first-time homeowner, you no longer have the feeling that you’re just throwing money away. Unlike a rent payment, your house is an investment, which is wonderful, but it’s also important to know about other expenses that can “creep up on you.” There are expenses which you may not have considered originally such as homeowner’s insurance and property taxes. The first thing to do is create a new budget and review all of your new expenses!
If you’re an experienced homeowner you probably already know the ins and outs of having a home, however, there is always more to learn! Sometimes it also helps to have a resource to assist you in taking care of your home. Included in our article is an extensive planning guide filled with information on how to create a budget for your home, tips on mortgages, insurance, and taxes, suggestions on how to save money on utility bills, and related homeowner planning tips.
Create a New Budget!
-
Review your old budget and what you previously spent money on.
-
Plan on budgeting for home owner’s insurance and property taxes. (Plus, don’t forget that you’ll need to assume that in the future your property taxes will increase. Plan and save accordingly!)
-
Consider how to cover the cost of new furniture, home furnishings, and other housewares.
-
If you have any land, remember that you will need to budget for supplies to take care of your property such as a lawn mower, fertilizer, herbicide, patio furniture, as well as a snow blower or a good snow shovel or two (if you live in an area that gets snow).
-
Home Repairs. Repair is an ugly word that you don’t want to hear as a new or even seasoned homeowner! It can be critical to set aside money every month, perhaps even in a separate fund, for emergency home repairs. Home repairs or appliance replacements can cost anywhere from $2,000 to $10,000 dollars or more if you need to fix a roof or your heating or cooling system breaks suddenly.
-
Lastly, consider all your new expenses and how to set aside money for your mortgage, taxes, new furnishings, lawn care, and home repairs. Then, go ahead and make your new budget!
Here are some considerations to think about when buying a new home.
Where Life Hits Your Wallet: Mortgage Payments, Insurance, and Taxes!
Mortgage Payments and Insurance: Shop around for homeowner’s insurance when buying a new home. Don’t immediately accept the first suggestion you receive from your realtor. If you’re not careful you will be paying more than you should. Also, weigh your options before you decide to take a loan and avoid private mortgage insurance (PMI). PMI can cost you dearly and add a significant chunk of change to your mortgage payment. If possible avoid PMI by waiting to buy a home until you can afford a 20% down payment on your new future home! Hint: Try to make large mortgage payments in the early years of owning your home to reduce interest and other costs.
Taxes: Hello property taxes! Never had those before, did you? Property taxes can become a serious financial hardship if you didn’t plan accordingly for them throughout the year. Some people use an escrow system that helps them pay for the mortgage and property taxes year-round. If you choose to use a company with an escrow system to manage your mortgage and tax payments. check with them regularly to guarantee that the correct payments are being made. On the other hand, if you are handling your property taxes by yourself, it is key to remember to budget monthly for your taxes and set aside money for your property taxes throughout the year.
We even have more financing resources here and a guide to learn homebuying terms here!
Extra Home-Owners Tips!
Mortgage Rates and Debt:
How much of a home can you afford? It is highly recommended by endless sources that your mortgage payment does not exceed more than 25% of your monthly income. Try limiting your mortgage to a 15-year fixed-rate mortgage if possible. If you don’t think you have enough savings to afford a mortgage, consider waiting a little longer to purchase your first home. Additionally, it is recommended that before you purchase a home you clear yourself of any other existing debt, such as school loans and or credit card debt. If you are paying a hefty mortgage, a car payment, school loans, and credit card debt at the same time, you may quickly find yourself overwhelmed. In other words, “don’t bite off more than you can chew!” Be realistic about your available funds, your current income, and your projected future income and expenses.
Purchasing Home Furnishings:
Part of planning wisely includes planning for the expense of furnishing your new home. It may be tempting to run to the furniture store, swipe your credit card, and fill your new home with top quality furnishings, but it’s wise to wait until you have the funds on hand. If you are feeling strapped for cash after putting the down payment on your home, know that it’s perfectly reasonable to buy furnishings over time. You can also consider other ways to limit furniture costs such as buying used and like-new furniture from second-hand stores and centers such as Habitat for Humanity Restore shops, Salvation Army, and even Goodwill, or your local thrift shop. Be thrifty and have fun at the same time! You can always upgrade your furniture later when you can afford it.
Reducing Existing Expenses:
Lastly, eliminate or reduce unnecessary expenditures! Ask yourself, do you really need 300 channels worth of cable TV or is a subscription to Netflix, a Roku, and an antenna? What other expenses do you have that you can control, reduce, or eliminate? Magazine subscriptions for magazines you don’t read? Expensive contract phone plans? Additionally, don’t fall into the trap of purchasing appliance insurance. You don’t need it and in the end, you’ll more than likely only waste more money! Instead of buying appliance insurance, set aside money every month for appliance and other home repairs. If you don’t need your repair/appliance fund immediately, that’s great, save it for a rainy day!
Tax Breaks:
Look into what tax breaks and credits you can be eligible for now that you are a homeowner! Make sure to get every penny of your taxes back that you can. If you are not financially savvy try contacting a helpful friend, simply “Google” what tax breaks you should receive, or contact your financial advisor or a tax expert, for assistance.
If you’re a first-time homebuyer, here is what you can expect at closing.
Take Precautions and Save Money!
Even though we have already mentioned over 60 ways to prevent potential house repairs and issues in the above checklist we still have a few pointers that can assist you with maintaining both your home and your budget!
After You Move In:
Mark and label centrical breakers right after you move in, so you know what they do and which ones they are. Later you may find yourself confused. You should also learn where your utilities (wires, pipes, etc.) are located in your yard and mark them too. If you are planning on planting a few trees you’ll want to be certain you don’t cut some important wires in the process. Speaking of trees, shortly after you move in we suggest that you plant some trees. You can have shade in your yard and even on your house! Your future self will thank you years from now that you planted trees immediately after you moved in!
Lastly, check everything. In case we haven’t already said it. Check everything before and after you move in. If there is anything wrong, know your contract, and contact your builder, real estate agent and anyone else who was involved in the construction or purchase of your home. If you bought a home with Dynasty Partners, rest assured we provide an excellent one-year warranty. Furthermore, double and even triple check the address that your new utility companies have on file to be certain that you will receive the bill. Now, most companies also offer online notifications and bills for your convenience.
How to Save Money on Your Utility Bills:
In addition to performing regular house inspections and controls, you may find that there are still other ways you can cut down on current and future bills. One of the most common suggestions to new homeowners is to utilize energy efficient appliances and LED or CFL lightbulbs. Saving on your electricity bill can be quite important during months with extreme temperatures. Another way to control your utility usage is to utilize ceiling fans in rooms of the house that are used the most. You can also consider installing a programmable thermostat to control how much energy you use, as well as your electric bill. Try reducing the temperature on your hot water heater to lower than the average temperature to minimize energy use.
There are also tips which you can follow to save money that don’t cost you anything except for a few seconds of your time! Unplug appliances that are not in use and are not essential such as coffee machines, toasters/toaster ovens, lamps, microwaves, computers, and other household appliances. Plug them in only when you need them! Consider using a SmartStrip for your home appliances as well. Utilize curtains and blinds to keep the house cool or warm to prevent you from running your heat or AC unit around the clock! Don’t forget to turn off the lights when you the leave the room. If you have outdoor space, try using a clothesline to dry your clothes rather than your dryer. Your energy bill will be lower and your clothes will be freshly dried. Also, be certain that when you run the dishwasher or washing machine that it’s completely full. Use the toaster oven or toaster instead of the oven for small meals too. Don’t waste energy and money for no reason, right?
Keep Track of Everything:
Keep track of your repairs, home renovations, leaky sinks, clogged vents, and sidewalk cracks. It may seem a little ridiculous, and even tedious, but you may want to keep an excel spreadsheet with the dates that you replaced appliances, filters, pipes, etc. Whether you are a fan of lists or not, keeping one can help you remember when you last added salt to the water heater, cleaned the gutters, or checked the roof. Even mark cracks in the basement, walls, or ceiling with tape with the date when the crack was noticed. If you carefully inspect and examine each potential problem area in your home consistently, you have the power to prevent problems before they occur, save yourself from a significant amount of stress, and save money too! We hope that you have found our official homeowner’s guide to be helpful. Feel free to share it with other homeowners and be proud of your new home!
Click HERE for additional information regarding foam insulation or download the pamphlet below.
scienceofsprayfoam
COMPANY INFORMATION – POTENTIAL INSPECTORS
Thanks for your interest in working with us at Greenbelt Structural and The Austin Home Inspector (TAHI). We are a small, growing firm servicing the Central Texas area. Along with real estate inspections, our company and parent companies offer:
-WDI (Termite) Inspections and Termite Treatment/Remediation Services
-Pre-Market Assessments and Seller Consulting
-New Construction Phase Inspections
-Investigations of Property Issues/Concerns
-Thermal Camera Assessments
-Plumbing Camera Assessments
-Mold Inspections/Assessments
-Investor Assessments and Consultations
-Drone Flight Assessments
-Commercial Inspections
COMPANY BENEFITS AND PAY SCALES – POTENTIAL INSPECTORS
Here at TAHI Services, we offer the most competitive payout percentages in the industry. Our goal is to build lasting relationships with highly qualified inspectors and newly licensed inspectors who have exceptional potential to grow in the inspection industry. Some of the benefits of working with TAHI include, but are not limited to:
-Paid Training/Apprenticeship: 15% of Inspection Fee During Training Period
-Low Percentage Split on All Jobs: 80% Average Payout
-Termite Inspector (Applicator Tech) Licensing and Insurance Covered By TAHI
-All Insurance Coverage Paid By TAHI (Over $1,000,000 in Coverage)
-Opportunity for Additional Licensing and Services Offered
-Complete Independence: You Set Your Own Schedule
-App and Reporting Software Access: In-House Report Writing Platform
-Financial Benefits for Building Your Own Client and Agent List
-Repayment Program to Assist in the Purchase of Tools and Equipment
WHAT WE EXPECT FROM YOU – POTENTIAL INSPECTORS
Members of the TAHI team are expected to operate and perform as business owners and entrepreneurs. Andy Jordan, the company principal, entered into this field, in large part, out of passion for independence and the desire to build a business that surpasses the status quo. For this reason, we expect our fellow members to operate completely independently, professionally, and with a focus on self-reliance, business growth, and superb client satisfaction. To accomplish this mission, we expect the following from our members:
-Exceptional Communication With Clients and Agents
-Ability to Speak and Write in a Professional Manner
-Above Average Inspection Services and Reports
-Availability to Consult With Clients After the Inspection is Complete
-A Strong Drive to Market Yourself and Build Your Own Client/Agent List
-Desire to Grow and Improve in Your Industry
-Ability to Operate Independently, Set/Meet Your Own Goals
BUILDING YOUR BUSINESS AND INDEPENDENCE:
We work to ensure our inspectors and consultants remain with TAHI as long as possible. We accomplish this by offering a value to our members that far surpasses the percentages we collect. In our spirit of independence, we assist all members in forming their personal companies and building skills to grow as a business owner as well as an inspector.
EMAIL OR CALL TODAY
512-788-1001
[email protected]